Disclosure: This post contains affiliate links to Higgsfield. If you sign up through my links, I may earn a commission at no extra cost to you.
I created an AI personal brand photoshoot that actually looks like me — not a younger, smoother, vaguely similar AI version of me.
And that is the part that surprised me.
I used Higgsfield Soul 2.0, created a character from 15 photos of myself, found reference photos for the kinds of images I wanted, and then started experimenting.
Some of the results were shockingly good.
Others gave me bizarre poses, the wrong hair, completely invented apartments, camera angles I didn’t ask for and, at one point, a giant second version of my face floating in the photograph.
So no, this wasn’t a case of typing one magical prompt and getting a perfect AI photoshoot.
But once I figured out what Higgsfield responded to, I started creating images I would genuinely use on my website, LinkedIn, Instagram, YouTube thumbnails and marketing.
Here’s exactly what I did, including the prompts that worked, the instructions that didn’t, and the things I’d do differently if I started again.

Try Higgsfield and create your own Soul ID →
Step 1: Create your character in Higgsfield
Before worrying about prompts, poses or Pinterest references, create your character.
I created mine directly inside Higgsfield using Soul ID and uploaded 15 different photos of myself.
This is the foundation of the entire process.
If the character doesn’t really look like you, you can write an incredible photography prompt and still end up with a beautiful photograph of someone who isn’t quite you.
I used a mixture of photos rather than 15 nearly identical selfies.
You want Higgsfield to understand what you actually look like from more than one perfect angle.
Once my character was created, the likeness was the first thing that genuinely shocked me.
We’ve had AI tools capable of generating photorealistic people for a while. That’s not particularly interesting to me anymore.
Creating a beautiful blonde woman isn’t the goal.
Creating an image where I immediately think:
“Yep. That’s actually me.”
That’s different.
And Soul 2.0 got surprisingly close.
Step 2: Find photos you actually want to recreate
My next step was Pinterest.
This turned out to be much more useful than simply asking AI to create a “professional personal brand photograph.”
Think about how vague that instruction actually is.
What does professional mean?
Corporate headshot?
Woman sitting at a desk?
Blazer and laptop?
Standing in a pristine beige apartment holding coffee?
The AI has to make all those decisions for you.
I didn’t want it to.
Instead, I found photographs that already had something I wanted.
That could be:
- a headshot
- a personal brand photograph
- an editorial portrait
- a pose
- an interesting camera angle
- an outfit
- a particular composition
- or even a screenshot from a film
I wasn’t trying to recreate the person in the photograph.
I wanted the visual idea.
If I liked the way someone was sitting on a sofa, I wanted that pose.
If I liked the way a photograph had been shot diagonally across a table, I wanted that composition.
If I liked a photograph because the person occupied only a small part of the frame and there was lots of space around them, I wanted that.
Then I used my reference with my Soul character in Higgsfield and described what I wanted the resulting image to look like.
This is where the real experimentation started.
Step 3: Don’t assume your character will stay exactly the same
Initially, I thought creating a Soul ID would solve the identity problem.
I’ve given Higgsfield my character. It knows what I look like. Done.
Not quite.
The likeness could be excellent while smaller details still drifted.
My short blonde bob could become longer.
My face could become more polished.
My age could subtly change.
My proportions could change.
So I started explicitly locking the things that mattered.
This was one of the identity instructions that worked well for me:
IDENTITY IS THE HIGHEST PRIORITY. The woman must clearly be my selected character. Preserve her actual facial structure, eye shape and spacing, nose, lips, jawline, face shape, skin tone, age and recognizable natural appearance. Do not beautify, de-age, reshape, slim, symmetrize or reinterpret her face.
Then I dealt with my hair separately:
HAIR IS FIXED. Preserve her exact short blonde chin-length bob, ending cleanly around jaw/chin. Style it as a polished but natural modern bob with soft side part, smooth texture, subtle volume at roots and gentle movement through ends. Ends curve softly around jaw rather than fluffy/wavy. A few natural loose strands around face keep it relaxed and realistic. Freshly styled but effortless, not salon-perfect. Maintain actual hair colour and density.
That level of detail might look excessive.
It wasn’t.
My hair was one of the things Higgsfield kept deciding to reinterpret, so it needed its own instruction.
What didn’t work: vague identity instructions
Something like:
Make her look exactly like my character.
wasn’t enough for me.
“Exactly” sounds precise to a human, but it doesn’t actually describe what needs to remain exact.
I got better results when I explicitly named the features I didn’t want reinterpreted.
What also didn’t work: obsessively telling it what NOT to do
I then went too far in the opposite direction.
At one point I had instructions along the lines of:
CHARACTER REFERENCE IS FOR IDENTITY ONLY. Do NOT display, insert, overlay, paste, frame or reproduce the character reference anywhere inside the generated photograph.
Sounds sensible.
Except Higgsfield started generating images with a second giant face/reference image inside the actual photograph.
Exactly the thing I was trying to stop.
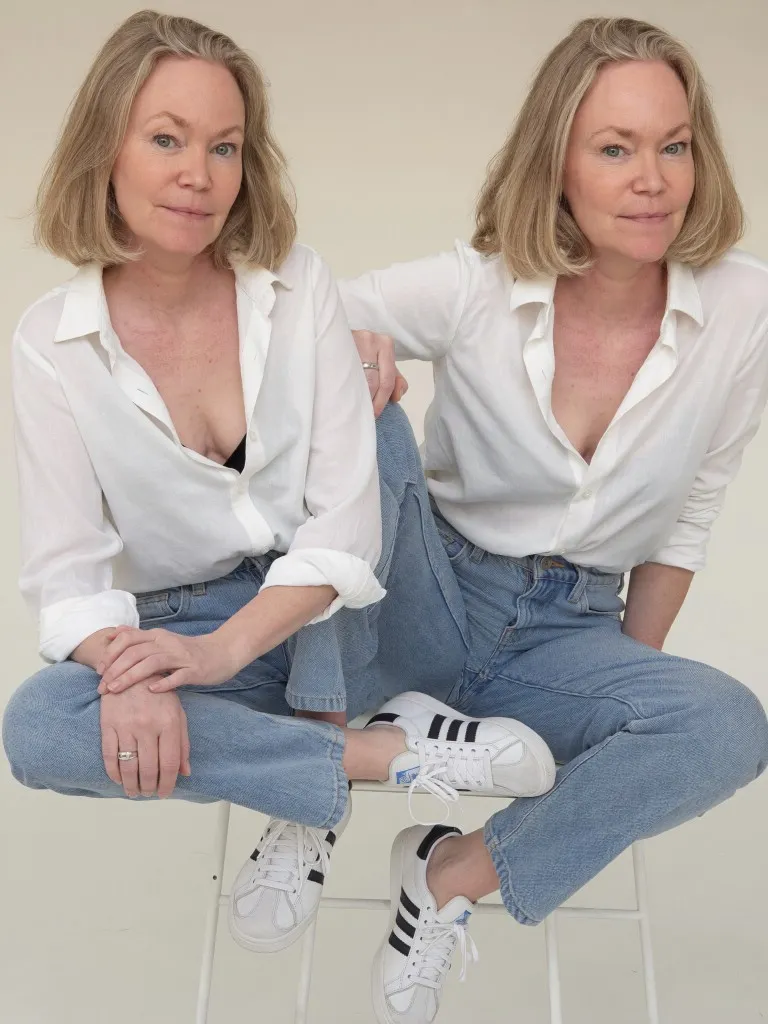
That taught me something important:
Specificity is good. A giant list of negative instructions isn’t necessarily good.
Once I stopped repeatedly talking about the “reference image”, “overlay”, “insert”, “picture” and so on, that problem stopped being the centre of the prompt.
My prompts became much more focused on describing the image I did want.
Step 4: Lock your clothes if the outfit matters
Clothes drift too.
For the casual personal-brand images I wanted a very specific look: white shirt, jeans, minimal jewellery.
So I stopped saying things like “casual professional outfit” and wrote:
CLOTHING IS FIXED: crisp relaxed white button-down shirt, loosely tucked into high-waisted light blue straight-leg jeans. Sleeves casually rolled to forearms. Minimal silver jewellery.
For another series, I wanted an all-black look:
Simple refined matte black top with elbow-length sleeves and full-length black trousers. Clean neckline, relaxed flattering fit and minimal silver jewellery. Sleeves cover the upper arms and end around the elbow.
Again, the principle matters more than my particular outfit.
If you care what you’re wearing, don’t give AI a fashion brief. Give it the outfit.
“Stylish casual outfit” gives the model creative control.
“White oversized button-down tucked loosely into high-waisted light-blue straight-leg jeans” gives it considerably less.
For this kind of photoshoot, less AI creativity was often exactly what I wanted.
Step 5: The camera instructions changed everything
This was probably the most useful thing I learned from the entire experiment.
I wanted photographs with space around me.
That’s particularly important for personal-brand photography because I want to use the images on websites, landing pages, social posts and thumbnails.
Negative space gives me somewhere to put copy.
So I asked Higgsfield for:
Lots of negative space.
And it would still give me a relatively close photograph.
I tried emphasizing the negative space.
Still too close.
Eventually I stopped describing the aesthetic and started describing the physical camera setup.
For example:
CAMERA AND COMPOSITION: vertical environmental personal-brand portrait from 4–5 metres away using an 85mm lens, camera at chest height. Complete head and bob visible. Subject occupies approximately 45% of image height with substantial environment and clean negative space above and around her.
That worked much better.
I wasn’t simply saying “don’t make it close.”
I was giving Higgsfield something visual to construct:
Camera: 4–5 metres away.
Lens: 85mm.
Subject: approximately 45% of the image height.
Framing: complete head and hair visible.
Space: substantial environment around the subject.
If Higgsfield keeps giving you the wrong composition, try describing the photograph as though you’re giving instructions to the photographer.
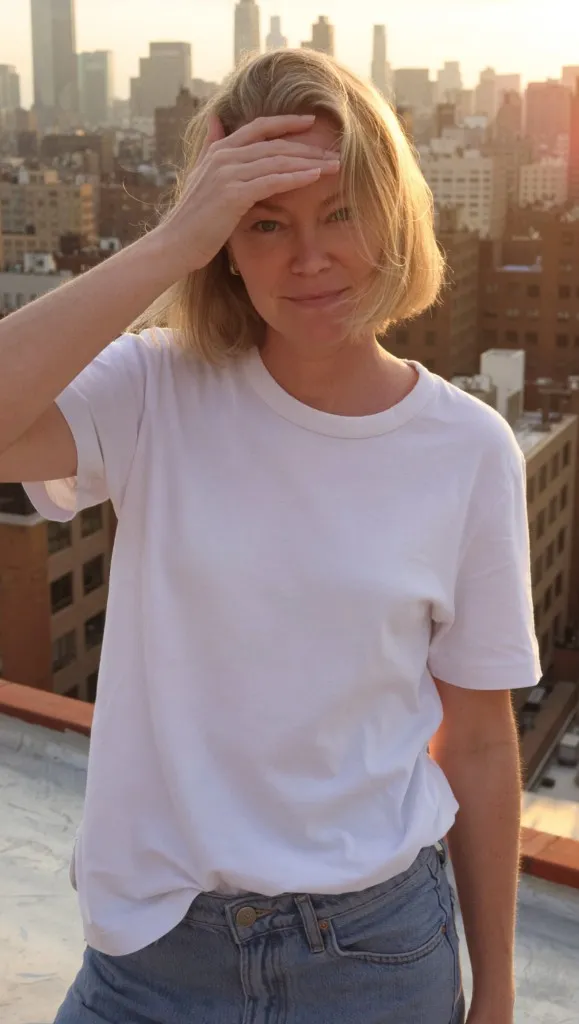
The composition here is exactly what I wanted — environmental portrait, subject smaller in the frame, lots of cityscape behind me. But Higgsfield de-aged me significantly; I look like I’m in my 20s rather than my actual age. Great scenery and framing example. Wrong identity. This is why locking age and facial structure in your identity block matters.
Try these prompts with your own Soul character in Higgsfield →
Step 6: When you get a camera angle you love, stop changing it
One of my favourite results was a photograph of me sitting at a pale wood table.
The important part wasn’t actually the table.
It was the camera angle.
The camera was positioned slightly to the front-left, looking diagonally across the table. The corner of the table created a strong line through the photograph, the laptop sat on the left and I was farther back on the right.
It looked like a real editorial photograph rather than someone standing directly in front of me taking my picture.
Once I realised I loved that angle, I wrote it down:
Vertical environmental portrait from a slight front-left angle, camera diagonally across table from her.
Near-left corner of pale wood table prominent in foreground, strong diagonal leading line toward her.
Open MacBook Air on left side of table angled toward her.
Coffee mug between her and laptop.
She sits on right side of frame, turned slightly toward camera.
Camera at seated chest/shoulder height looking across tabletop, not above.
She occupies roughly right-middle third; complete head and bob, torso, seated body and part of legs visible; substantial negative space above and behind.
Table occupies much of lower-left foreground while she is farther back right.
85mm lens, natural perspective.
Then I reused it.
This sounds obvious now, but initially I kept rewriting prompts from scratch.
That’s a mistake.
If you get a photograph where the composition is right but something else is wrong, don’t throw the composition away.
Keep the camera instructions and change the thing that’s wrong.
Step 7: Describe poses like you’re directing an actual person
AI can create an incredibly realistic face and then apparently forget how legs work.
One of my reference photographs had a seated pose I liked.
I tried:
One leg crosses naturally over the other at the knee.
That did not reliably give me the elegant seated pose I had in mind.
Instead, I got variations with a leg raised awkwardly towards the camera.
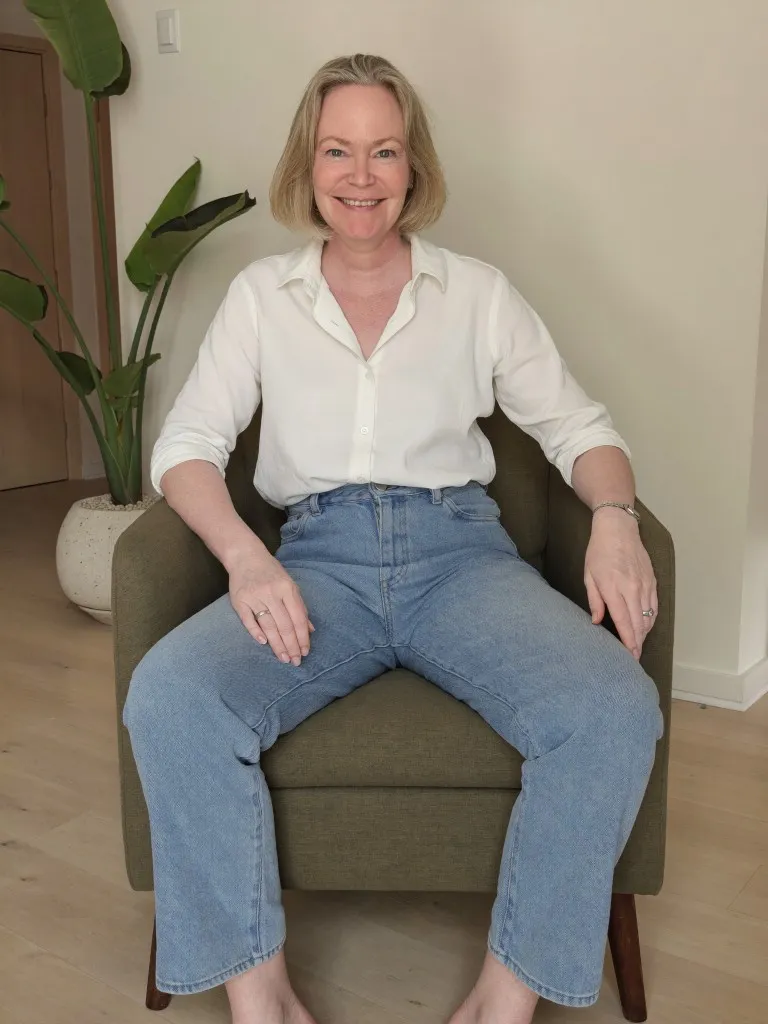
For the stool photographs, this worked much better:
Both feet on the floor, knees together and angled gently to one side, ankles close, one foot slightly forward.
That’s much harder to misinterpret.
The same applies to hands.
Instead of:
Holding coffee.
I used:
Holds a simple ceramic coffee mug with both hands at waist height.
For another pose I specifically described where an elbow was resting and where the hand supported the face.
Again, you’re effectively directing a photoshoot.
If you would tell a real person where to put their hands or feet, tell the AI too.
Step 8: Describe what’s physically behind you, not an interior-design concept
Backgrounds were another battle.
I wanted very simple Pinterest-style environments.
But phrases like:
Sophisticated minimalist workspace.
or:
Refined Scandinavian apartment.
gave Higgsfield far too much creative freedom.
Suddenly I had an entire imaginary home.
Doors. Hallways. Kitchens. Sofas. Shelves. Random chairs. Air-conditioning vents. Furniture everywhere.
It wasn’t necessarily ugly.
It just wasn’t the photograph I wanted.
I got better results when I stopped naming the type of room and described the actual pixels I wanted behind me:
Warm off-white plaster wall fills most of the background. Light-grey sofa subtly enters from the right. One tall sculptural green plant partially visible at the far right. Soft natural daylight with gentle realistic shadows.
Or even simpler:
Single continuous warm off-white plaster wall filling the entire background. Pale natural floor. Large areas of clean negative space.
That’s boring as an interior-design brief.
It’s excellent as an AI image-generation instruction.
Step 9: Ask for photographic imperfections
One of the easiest ways for an AI portrait to look AI-generated is for everything to become too perfect.
Perfect skin.
Perfect symmetry.
Perfectly smooth hair.
Perfect lighting.
Perfectly clean fabric.
Real photographs aren’t like that.
So I started including things such as:
Natural skin texture, pores, fine lines, slight facial asymmetry, individual realistic hair strands, natural cotton and denim texture and slightly imperfect photographic detail.
I also used:
Soft natural daylight from one side, gentle realistic shadows and depth. Background subtle natural blur, face and hair sharp.
The goal wasn’t to make the image look worse.
It was to stop Higgsfield from “improving” reality until it stopped looking real.
My full Higgsfield prompt
After all of those experiments, this is the kind of complete prompt that started producing much more consistent results for me:
Create a natural Pinterest-style professional lifestyle photograph featuring my selected Higgsfield character.
IDENTITY IS THE HIGHEST PRIORITY. The woman must clearly be my selected character. Preserve her actual facial structure, eye shape and spacing, nose, lips, jawline, face shape, skin tone, age and recognizable natural appearance. Do not beautify, de-age, reshape, slim, symmetrize or reinterpret her face.
HAIR IS FIXED. Preserve her exact short blonde chin-length bob, ending cleanly around jaw/chin. Style it as a polished but natural modern bob with soft side part, smooth texture, subtle volume at roots and gentle movement through ends. Ends curve softly around jaw rather than fluffy/wavy. A few natural loose strands around face keep it relaxed and realistic. Freshly styled but effortless, not salon-perfect. Maintain actual hair colour and density.
CLOTHING IS FIXED: crisp relaxed white button-down shirt, loosely tucked into high-waisted light blue straight-leg jeans. Sleeves casually rolled to forearms. Minimal silver jewellery.
She is standing casually beside the end of a soft light-grey upholstered sofa, body angled very slightly toward camera. Relaxed natural posture.
Holds simple ceramic coffee mug with both hands at waist height, as if paused with morning coffee.
Looks directly at camera with big genuine spontaneous smile, natural smiling eyes and relaxed cheeks; candid and joyful, not formally posed.
CAMERA AND COMPOSITION: vertical environmental personal-brand portrait from 4–5 metres away using 85mm lens, camera at chest height. Complete head and bob, torso, hips and upper legs visible. Occupies approximately 45% of image height, with substantial environment and clean negative space above and around her. Spacious, not close-up.
SETTING: warm bright refined minimalist living space. Warm off-white plaster wall fills most background. Light-grey sofa subtly enters from right. One tall sculptural green plant partially visible at far right. Two understated abstract artworks far behind, softly out of focus.
Soft warm natural daylight from one side, gentle realistic shadows and depth. Background subtle natural blur, face and hair sharp.
Real Pinterest editorial personal-brand photography. Natural skin texture, pores, fine lines, slight facial asymmetry, individual realistic hair strands, natural cotton and denim texture, slightly imperfect photographic detail.
FINAL REQUIREMENTS: exact recognizable identity, short polished blonde chin-length bob with soft side part and smooth natural movement, natural age and skin texture, white button-down, light blue jeans, coffee mug held naturally in both hands, genuine open smile, warm minimal interior, spacious environmental composition and substantial negative space.
You obviously shouldn’t copy the physical description of me.
But the structure is worth stealing:
Identity → hair → clothing → pose → expression → camera → setting → lighting → realism.
Replace my characteristics with yours.
A simpler prompt can sometimes be better
This is where the experiment got interesting.
After spending all this time learning that detail matters, I also learned that more words aren’t automatically better.
There’s a difference between being detailed and being complicated.
If the photograph is already close, don’t rewrite the entire prompt and add another 500 words.
Change the one thing that’s wrong.
If the hair is wrong, tighten the hair instructions.
If the camera is too close, change the camera instructions.
If the pose is weird, physically describe the pose.
If the room is cluttered, simplify the background.
I got worse results when I kept stacking negative instructions on top of negative instructions.
So my rule became:
Be extremely detailed about what you want. Be selective about describing what you don’t want.
That’s a surprisingly important distinction.
I occasionally fixed the background in Canva
There were also images where Higgsfield absolutely nailed me but I didn’t like the background.
At that point, regenerating the whole photograph felt ridiculous.
I could fix the background and lose the face.
Fix the face and lose the pose.
Fix the pose and suddenly my hair changed.
So for a handful of images, I removed the background in Canva and generated a replacement.
I deliberately kept those prompts much shorter because Canva’s background generator has limited room and I wasn’t asking it to recreate the person.
For a studio background, I used:
Bright photo studio, seamless warm off-white backdrop several metres behind subject, creating natural depth. Pale neutral floor, large clean negative space, soft diffused studio light, realistic shadows, background slightly out of focus.
The important bit there was “several metres behind subject.”
Without that, the generated background looked like it was practically attached to me.
This isn’t a Canva tutorial, and Canva wasn’t the main tool in this experiment.
It was simply a useful way to rescue an image when Higgsfield had already nailed the difficult part.
What worked and what didn’t
After burning through plenty of generations, these were my biggest takeaways.
What worked


Creating a strong Soul ID first. Everything depends on the underlying character actually resembling you.
Using real visual references. Starting from a photograph I already loved gave me much more control than asking AI to invent a photoshoot.
Being extremely specific about important details. Face, hair, outfit, pose and composition all improved when I stopped assuming Higgsfield knew what I meant.
Giving physical camera instructions. Distance, lens, camera position and percentage of the frame were far more effective than repeatedly asking for “negative space.”
Describing the pose physically. Feet here. Knees there. Mug in both hands. Much better than “casual pose.”
Describing visible background elements. A wall, a floor and one plant worked better than asking for a “beautiful minimalist apartment.”
Saving what worked. Once I found a camera angle or identity block that worked, I reused it rather than starting over.
What didn’t work

Early generation that looked nothing like me. Wrong pose, flat lighting, and that unsettling “almost me” quality that makes the image unusable for personal branding.
Vague aesthetic language. “Professional,” “minimalist,” “casual” and “Pinterest-style” can help set a direction, but they don’t give you enough control on their own.
Telling it only that I wanted negative space. The camera still came too close.
Letting AI choose the pose. Sometimes fine. Sometimes anatomically hilarious.
Assuming my hairstyle would remain consistent. Apparently a chin-length bob is merely a suggestion unless I keep reminding it.
Overloading the prompt with negative instructions. More instructions did not automatically mean more control.
Regenerating everything to fix one problem. Often I’d fix one thing and lose three things I already liked.
De-aging without explicit guardrails. Even when composition and scenery were perfect, Higgsfield could still make me look decades younger unless I locked age in the identity block.
Would I actually replace a professional photoshoot with AI?
For some purposes?
Absolutely.
That was the biggest surprise from this experiment.
I’m not saying I’ll never hire a photographer again.
A great photographer can direct you, react to you and capture genuine moments. There are still things a real photoshoot does better.
But personal brands need an absurd number of images now.
Website hero images.
About pages.
LinkedIn posts.
Instagram.
YouTube thumbnails.
Podcast graphics.
Landing pages.
Speaker bios.
Course pages.
Lead magnets.
And every few months your website changes, your positioning changes or you simply get bored of seeing the same five photographs everywhere.
Organising a professional photoshoot every time I want a new visual direction makes no sense.
With Higgsfield, I can find an image that inspires me on Pinterest, take the composition or pose I like, use my Soul character and experiment.
And when it works, the result doesn’t just look like a photorealistic AI person.
It looks like me.
That’s the part I wasn’t expecting to be this good.
Try it yourself in Higgsfield
If you want to create your own AI personal brand photoshoot, don’t start by trying to generate 30 perfect photographs.
Start with one.
Create your Soul ID in Higgsfield here.
Use a good selection of real photographs of yourself and spend the time getting the character right.
Then go to Pinterest and find one reference image you genuinely love.
Look at it properly.
What’s the pose?
Where is the camera?
How much of the frame does the person occupy?
What are they wearing?
What’s physically visible in the background?
Where is the light coming from?
Then recreate those ingredients with your character.
If something doesn’t work, don’t immediately rewrite everything.
Work out which part failed and change that part.
And when you finally get something right — the identity prompt, your hair description, an outfit, a pose or a camera setup — save it and reuse it.
That’s how I went from fighting Higgsfield’s random decisions to creating personal-brand photographs I’d actually publish.
Try Higgsfield Soul 2.0 and create your own AI photoshoot →
And if you came here from my video: yes, the spectacularly bad generations were real too. The good news is that figuring out why they were bad is exactly what made the later images so much better.